Thursday 2 September 2010

Bibliography

Books:

Balius, A. (2003) Type At Work: The Use Of Type In Editorial Design, BIS Publishers, Amsterdam.

Foges, C. (1999) Magazine Design, RotoVision, Hove,  East Sussex

King, S. (2001) Magazine Design That Works, Rockport Publishers Inc, Gloucester, Massachusetts.

Leslie, J. (2003) magCulture: New Magazine Design, Laurence King Publishing, London.

Losowsky, A. (2007) We Love Magazines, Editions Mike Koedinger, Luxumbourg.

Moser, H. (2007) The Art Director’s Handbook Of Professional Magazine Design, Thames and Hudson, London.

Muller-Brockmann, J. (1996) Grid Systems In Graphic Design, Verlag Niggli AG, Switzerland.

Rothstein, J. (2007) Designing Magazines, Allworth Press, New York.

Zappaterra, Y. (2007) Editorial Design, Laurence King Publishing, London.

Websites:

www.1designsource.com
www.andsmithdesign.com
www.apple.com
www.artofthegrid.com
www.blurb.com
www.brainyquote.com
www.cargocollective.com/emilytu
www.creativereview.co.uk
www.dandad.typepad.com
www.deannecheuk.com
www.dhnn.com.ar
www.emigre.com
www.eyemagazine.com
www.fusioncreativeservices.co.uk
www.grainedit.com
www.graphic-design.com
www.issuu.com
www.kristineddington.com
www.letskiosk.com
www.lulu.com
www.magculture.com
www.magforum.com
www.mediamemo.allthingsd.com
www.minddesign.co.uk
www.modernpublicity.com
www.monsieurlagent.com
www.nylonmag.com
www.objectif.co.uk
www.pentagram.com
www.redhouselane.com
www.royalmail.com
www.sociodesign.co.uk
www.spd.org
www.studioverse.com.au
www.tbgd.co.uk
www.ted.com
www.thedesignersrepublic.com
www.thevastagency.com
www.thirteen.co.uk
www.wikipedia.org
www.zinio.com

Interviews:

Matt Austin, Vast - email interview.
David Bailey, Kiosk - email interview.
Axel Feldmann, Objectif - email interview.
Holger Jacobs, Mind Design - email interview.
Ken Leung, Modern Publicity - Grain Edit interview.
Thom Bennett, TBGD - email interview.
Mike Brough, Fusion - email interview.
Antonio Carusone, AisleOne - email interview.
Paul Felton, Purpose - email interview.
Adam Nash, BrandNew - email interview.

FMP Evaluation

As a designer my main interest is type and layout for publication design and so for the FMP I tried to choose projects that would reflect this interest. I feel that I have achieved this goal as my work is heavily dependent on printed formats and typography. However in the process of doing these I have realised that I enjoy branding as all of my work has a strong identity. This new interest has combined with my old one and I think that the resulting outcomes are bold and interesting to look but also have a sound concept behind the work.

One of my aims within the FMP was to improve the quality of my work and finishing techniques. I had wanted to experiment with processes such as spot varnish for the postage stamps and gold foiling for the triangle in the magic brief but was unable to due to pregnancy and the time constraints imposed with this. I feel that my shorter deadline helped to drive my work and I was a lot more decisive about design decisions. In the design practice module I had done about a million design sheets but not really got anywhere. So this time I did the design sheets and then finalised my designs at much faster pace. This may have impacted on their quality but I think that making these choices quickly enabled me to create more things for each brief and really expand things out. I managed to work in formats that I haven't before such as iPhone apps and specialised websites. I didn't really stick to the deadlines I gave myself because I didn't know how much time I would have so I could have made better use of my timeplans. But as I created more things for each brief it became difficult to schedule things properly as I was always coming up with another thing to design.

However I am incredibly happy with how my briefs have turned out. I only managed to do about 2 and half of the 4 briefs I had set myself but I think I did so much work for each brief that it is a good indication of the level I would have achieved on further briefs if I had not left the course early. I really enjoyed doing the research for my magic brief, as I always do. I think it is important to learn about a subject and the related imagery before you try and design something for a certain audience. It is also very important to come up with a sound concept as it can make work so much more compelling than something that just looks nice.

The magic brief was interesting because I had to create so many different paper products and then find a way to package them together in a mailable format. I had some problems with creating the folder as finishing is not a strong point of mine but by remaking it until it was good enough allowed me to practice and finally create something that looked professional. I also had problems with the booklet because I printed it down in digital print but it wasn't printed incredibly straight as I needed it double sided and I messed up the margins with the guillotine. In the end I got it professionally printed by lulu.com. It looked a million times better and now has a nice glossy cover too. I am absolutely fine with creating artwork for most kinds of documents, its the printing and finishing that messes things up. But this is OK because professional designers just send their work off to the printers to be finished anyway. I know to do this in future and because of that my work will not be let down by poor presentation. However the printing did mess up on the badge. I chose a cheap printers and because of that the work suffered. But at a proper studio I would have a bigger budget and this would not be a problem. Overall I think the project was a success as it works as a complete set and I think the design and content would entice younger magicians to join the circle.

I also really enjoyed the postage stamp brief. I originally wanted to do some illustrative type for the stamps but when I started designing I found that interactivity would be better received. The customisable element works well because a relationship is a personal thing and it would stick in peoples mind as a product they would want to buy. It would also encourage a younger generation to be interested in stamps as it would make them more fun. The original brief was just to create 6 stamp designs so I feel that I really succeeded in expanding this project. I created lots of different sets for the stamps, postcards, posters, website graphics & layouts and an iPhone app. Creating an iPhone app design was hard as I had to look at how apps work and I don't own an iPhone nor have I ever used one. But from looking at other apps and thinking about what elements of the stamps could work on an iPhone I think the app would be plausible and a good way to promote the stamps to a new generation.

I am disappointed at how much I did for the Yin Yang exhibition brief. I started it in OUGD301 and wanted to create the tickets, exhibition catalogue and merchandise for the FMP. I only managed to do the tickets but I am happy with the design of these. I had learned about reveal formats and perforating during Design Practice when I used these techniques for my idiom project. I used these to create a perforated strip to show whether the ticket had been used yet or not. I think this worked well and my only regret is that I didn't start on the other things as I might have been able to do more.

I really enjoyed working on my design context book though and I am impressed with how much I managed to do. Doing this project has really solidified my interest in editorial design and I really want to go into this field. I managed to get some interviews with some good people. The only problem was that many people were on holiday so couldn't respond to my questions. And Hinterland replied a couple of hours after I had sent my book off to lulu.com which was a pain. I got lots of books out from the library which were very informative about editorial design. I am pleased with how the book looks and I think it is a good guide to the kind of work that inspires me and that I want to create. I love working in InDesign and experimenting with different ways to lay out body copy so I was very happy working on this project.

Overall, I am very pleased with my work on the FMP. It has enabled me to clearly state my interests as a designer and this is shown in the work here and in my portfolio. My main strengths during this module were research and concept development. This allowed me to create design work that was strong and effective. I think the work produced is appropriate to the briefs and target audiences. Another strength was my ability to work to a very tight deadline as I got most of the work done before April. As usual my main weakness was the finish of my work. I think I got around production issues by sending things off to lulu to be printed. I also took my time when creating things and re-made them if they looked really unprofessional. I feel that by completing this module to the best of my ability I am prepared to go into the world of graphic design. And now that my baby is nearly 6 months old I will be looking for a job in the industry with highly developed skills in type and layout.

Yin Yang Boards


Please click on each image to view at a larger size.
There are only two boards because I have only made the tickets. The other elements were from OUGD301.

Magic Boards


Please click on each image to view at a larger size.

Postage Stamp Boards


Please click each image to view at a larger size.

Monday 30 August 2010

Envelope

The brief says that the pack has to be mailable so I decided that the folder containing all of the printed matter will be packaged in a black metallic bubble envelope. I ordered a pack of six 242mm x 330mm envelopes from eBay for £10.


I want to make the address label look a bit special so I bought some gold paper from Paperchase to print onto. These are some of the labels I designed. Its hard to tell what will look good on the envelope so I will print all of these out and photograph them to see which one works best.

Folder


This was the first folder I made for the magic kit. It was just plain and black. It also didn't fit the poster in correctly and was a bit crappy looking because I didn't cut the slots properly. So I decided to remake it. It looks a lot better now.


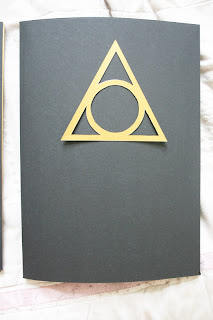
Here it is with the entire contents. I even affixed one of the badges to the side panel. When put together with the rest of the kit, the badge doesn't look so bad. I'm happy with how this looks now. However, the cover of the folder is still plain black and looks boring. I originally wanted to have the triangle logo on the cover, either embossed or with just a spot varnish to make it look really flash. But I don't have access to these facilities so I decided to do some paper cutting.


I wanted to cut into the cover and have gold behind it but when I tried it out, I realised that you only get the inner pattern, not the outer triangle so it doesn't really look much like the logo. Therefore I cut the logo out of gold card and will stick this to the cover.

Badges


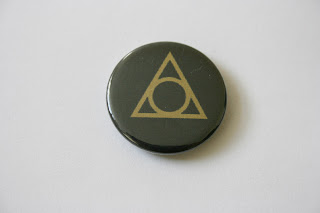
I got my badges back from koolbadges.co.uk. They look really crap. It looks like they printed it on a normal inkjet printer. The text/images look slightly pixellated despite being illustrator files! They'll have to do though because the deadline is too near. At least these give a clear picture of how they would look if they were printed professionally.

Friday 27 August 2010

Booklet Reprinted


Today I received the final copy of the magic booklet printed by lulu.com. Here it is with my design context book. The cover is on nice glossy paper so it looks really professional.


The main reason I wanted to get it printed professionally is because when I printed it in the dungeon, the bleed and margins got messed up so the text was far too close to the edge. Now the margins look how I intended them to. The only problem with the booklet now is there is one random white page at the back of the book. This is because when I worked it out to be printed in the dungeon, the backs of the cover spread were also printed onto. Because lulu.com don't print onto the back of the cover, the pagination got messed up slightly so they added an extra page. Otherwise, I'm very happy with the outcome.

Tuesday 23 March 2010

Stamp Minisite


This is the front page of the stamp minisite. Each stamp is a clickable button which launches a pop-up window with the content.


For example this is how the compatibility test page could look and below it is how it would layer up as a pop-up window on a web browser.


The e-card pop-up would allow you to choose a message and stamp and then customise these. An email would then be sent to the card recipient telling them to go to a web address to collect their card. An example of how the card would look is:

Magic Website


This is the layout for the main page of the Maleficium website. When you log in it will lead to the news page and clicking the links on the sidebar reveals more links below that section.

iPhone App


Mock ups of my iPhone App. It offers you the options of buying something from the Valentine's Day range or sending a free message to someone based on the customisable stamp edition.

Sunday 21 March 2010

Badges Update

www.thebadge.co.uk never got back to my query about getting the magic badges printed so I found another badge printing company called www.koolbadges.co.uk. I could tell they would be more reliable as they have an active twitter page. However they had a min order of £3.50 and then charge a pound for postage but now I'm getting a set of 4 badges printed for £5. These are the designs I uploaded.


It says it could take a week on the confirmation page so hopefully they're not too busy and I might get them in time for the crit.

Saturday 20 March 2010

Splash Page


Some layouts for the splash page of the Maleficium website. This is how it would look on the computer: